
Intro
Currently we had a lot of discussion on which web framework we should invest: Angular2 or React. Therefore I decided to experiment with both and make my own meaning.
Coming from Angular1 and loving it, I can’t pretend I’m completely objective. Nevertheless being a little frustrated with the breaking changes and late arrival of Angular2 and hearing a lot about the goodness of React, I wanted to give it a try and compare both frameworks with an open mind-set.
I took the perspective of an Enterprise .Net developer. In this comparison I value support for tooling that just work over purity/beauty of the framework. I also tested the integration with Visual Studio 2015 and Visual Studio Code.
In our environment applications have a lifecycle that can easily stretch over 10 years. In this context be able to support big projects and keep maintaining them over time is key. This is why I took Typescript as a given. Coming from a .Net background and having built all my Angular apps with the help of Typescript I don’t wanted to get back to pure JavaScript. I love the static type checking and all the tooling support, code completion and refactoring typescript brings to the table. So the applications I wrote to compare both frameworks used Typescript and the ease of programming with Typescript is for me important.
Overview
React
React is a declarative Javascript UI library, created by Facebook that handles a very specific set of concerns, composing and packaging your UI in components and rendering these components. What could seem odd in the beginning is that React doesn’t separate the HTML from the JavaScript. Frankly I got used to it and learned to appreciate the advantages of this. You can still separate the logic from the presentation by creating components that only render Html and Components that handles the logic (named “Controller Views” components).
Here is a simple example of a React component:
import * as React from "react";

export class HelloWorld extends React.Component<{}, {}> {
    render() {
         return (
            <div>

                <p>Hello world from react!</p>

            </div>
        );
    }
}
The render() method is the core method of the React component. React implements a virtual DOM, this is an internal representation of the DOM. Using his own representation of the real DOM and only rendering what was changed since last time render() was called.
A react component is typically written in a JSX file. JSX enables to mix the HTML tags inside the JavaScript part. To transform the JSX at runtime or compile time you typically need to use Babel. Now TypeScript provide support for JSX, this enable us to use the TypeScript compiler instead of Babel. Adding the compiler option: “jsx”:”react” in your tsconfig.json file will enable support for the the TypeScript compiler. When this is done you can use the “tsx” extensions in order to support “JSX” with typescript.
I found that VisualStudio 2015 and VS Code provided a good support for the TSX format. It differentiates the HTML and TypeScript part quiet well. With TSX you even get auto completion in the HTML parts.
To illustrate other key concepts of React we need a more sophisticated example:
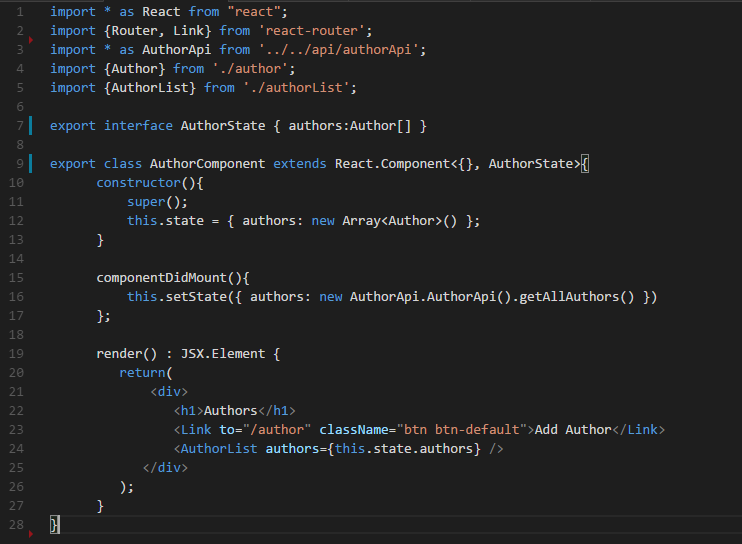
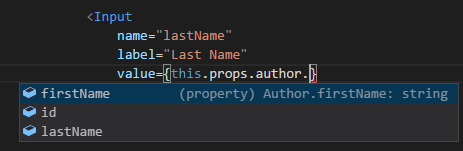
Notice on line 9, the two type arguments we pass to declare our AuthorComponent class. The first is the “prop” the other is the “state”. These two concepts should not be confused. “state” is an internal concern of the component, it holds the internal data (model) of the component and can change, and every time it changes the virtual DOM is adapted. “props” are passed to the component and are not meant to be changed. An illustration of the use of “props” is with “Controller Views Components”, these are parent components that host child components. “props” are typically used to pass the component properties:
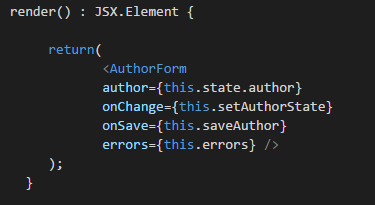
Here author, onChange, onSave, errors are “props” of the AuthorForm component.

In contrast with Angular, React is only a UI library; therefore it’s usually used with other libraries like Redux. Redux help us to manage the application data flows. You don’t absolutely need Redux but usually when building large scaled Enterprise applications it’s something you’ll want to add to your React apps. In fact you can even use Redux with Angular but the unidirectional flow of React lent itself very well to the Redux model. Redux is based on the original Facebook Flux library. It help to manage the application State. I found that managing state in a React application without Flux or Redux demand a considerable effort. Nevertheless these frameworks bring also a great amount of concepts. Explaining these is outside the scope of this article.
Angular2
Although Angular2 comes with a lot of breaking changes and you can’t upgrade directly from Angular1, Angular2 still feels like an evolution of Angular1 and I felt that’s the big changes that where introduced where relatively easy to learn coming from an Angular1 background.
For me coming from the .Net/MVVM world, Angular always felt familiar and I appreciate the similarities with the WPF data binding model. Nevertheless I still have troubles with the new binding syntax that is quite different of the used in Angular1.
Angular advocates the separation of HTML and Code. Although these can now be in the same file you don’t mix code & HTML in Angular. This’s usually a good practice especially when working with web designers. The downside of using a specific data-binding syntax is that you don’t get the code highlighting & code completion you get with React.
Angular2 is a framework and a quite complete one. With Angular you get all in a box. You can replace many parts but I never really needed to. From an Enterprise viewpoint, be able to count on a complete but modular toolbox is an advantage. It helps new hired developers to be productive faster and enforce consistency.
Here is an example of what a “Hello world” Angular2 app looks like. A small tutorial is available on the site of angular on how to setup a quickstart app. It took me less than 5 minutes to complete.
After completing this 5 min tutorial you get basically everything you need for client side development including a small web server (BrowserSync) configured to do edit & continue.
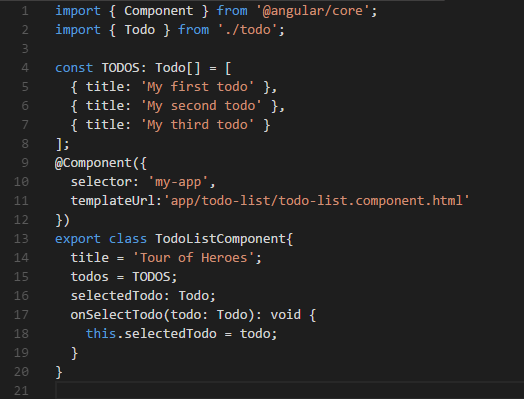
Angular separate the HTML from the code, you can add the Html inside a Component but it’s still in a separate section. To be able to add view logic inside the HTML you need to use the Angular2 template syntax. A simple Angular HTML component looks like this:
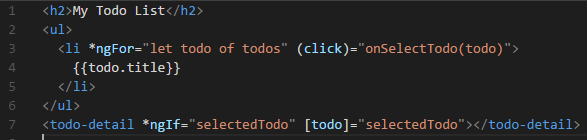
The *ngFor, {{todo.title}}, (click), [todo] and <todo-detail> elements are all Angular2 template syntax. The <todo-detail> tag represent a TodoListComponent.
The todolist.component.ts code could be like this:
Here is an example of how to define a two-way databinding works in Angular2:
<input type="text" [(ngModel)]="user.first_name" />
Every Angular2 app begins by declaring at least one module. This is an example of such a module:
import { BrowserModule } from '@angular/platform-browser';

import { FormsModule }   from '@angular/forms';

import { HttpModule }    from '@angular/http';

import { Router }        from '@angular/router';

import { AppComponent }             from './app.component';

import { TeamComponent }            from './team/team.component'

import { TeamService }              from './services/team.service'

import { routing }                  from './app.routing';


@NgModule({

    imports: [

        BrowserModule,

        FormsModule,

        HttpModule,

        routing

    ],

    declarations: [

        AppComponent,

        TeamComponent,

    ],

    providers: [TeamService],

    bootstrap: [AppComponent]

})


export class AppModule {

}
My evaluation
Angular2 loves TypeScript
For me the biggest difference between both is that Angular2 is TypeScript native and React just tolerates it. Sure you can use TypeScript with React, I provided some examples how you can do that nevertheless I spend a lot of time on figuring how. This is especially a problem when you consider that the React examples you find on the web are inconsistent. You can find many ways to do the same but some of them are not TypeScript friendly. During my experimentation with React I often was forced to use the <<any>> type. This means that I lost the goodness of working with TypeScript: compile time type checking, autocomplete and refactoring support.
Angular2 feels like home for C# devs
The React documentation provided by facebook is quite good but the Angular2 official documentation is just superb. Following the quickstart guide I was able to construct a full application in less than 5 minutes. You can also find a complete guide that covers every topic of the framework. The Angular2 “Tour of Heroes” is a tutorial where you build a real world application using every important aspect of Angular2.
Every example in the Angular2 documentation is provided in TypeScript. For React most documentation is in ES6. On other internet sites I found that most of the examples are still in ES5. Finding an up-to-date tutorial on how to bootstrap a standard React application with TypeScript is not easy. You can find one on the TypeScript site but it’s very basic. When you compare this to Angular2 where you even have guidance on how to setup VisualStudio you immediately understand that Angular2 is far more welcoming for C# devs as React. The only guidance I found on how to integrate TypeScript was on the TypeScript site. What I learned here is that usually you need to figure out by yourself how to use TypeScript with React as you don’t find a lot on the internet. So during my React experimental project I’ve wasted many, many hours in converting Javascript examples to TypeScript. I had some problems with inconsistencies between type definitions; sometimes I needed to tweak this myself to get my project compiled. I didn’t have any of these problems using Angular2, the type definitions where always up to date and all provided libraries worked well together.
I love mixing Html inside JavaScript
When working with React in VS.Code and VisualStudio, I was first disappointed as these editors didn’t support the JSX syntax correctly. All this changed when I converted my first code to TSX (the TypeScript equivalent of JSX). Here React really shined as I got type checking & code completion even inside my TSX templates. Mixing typescript inside the HTML was for me a little revelation. I still think web designers will not really like this but for me other frameworks should copy this great idea. You don’t need to learn another programming or templating syntax. You can use the same programming language everywhere. When you use TypeScript you even get static type checking in your templates what considerably diminish the number of mistakes you can make. Those who have already used Angular will certainly see the benefit of this. With Angular I can’t count the number of times I got a blank page or things missing on my page because I misspelled some property in the template or used the wrong templating syntax.
ErrorMessages feels a lot better
Another great aspect of React is the explicit error messages it provides.

In Angular1 you get usually at best a blank screen with completely useless error messages, now I found the error messages had improved tremendously in Angular2. It usually returns explicit messages with descriptions on how you can solve the problem.

Many ways to do the same thing
A pain point concerning React is the many ways to do the same thing. For example I found the following ways to create a React component: using the ES5 Create Class Component, using the ES6 class component, using stateless components, with Object.Create, with Mixins, creating Parasitic Components and with the StampIt library. Also a primary concern for me is the high churn rate of React, currently React is at version 15. This is a high number for a framework that is only a couple of years old.
Conclusion
For me the conclusion is that if you are a C# enterprise developer who wants to get all the goodness Typescript brings to the table, Angular2 is the obvious choice. React is a beautiful library that enforces good design but it doesn’t embrace Typescript as Angular2 does. React has certainly some advantages compared to Angular2 like using JavaScript as templating syntax but Angular2 is what an enterprise developer wants. It’s complete, opinionated and his Typescript native support makes it more crafted for large scale applications. Angular2 two-way binding also result usually in a higher productivity rate and less code to maintain when it comes to building business applications.