In this post I explain step by step how I build an Arduino based Robot. This can be a handy if you want to build your own. I explain which design choices I made, which frameworks and technologies I used and how I program and configured the robot. Here you can find a video of the end result.
What is needed?
The robot is based on a RoverV2 + Bluetooth Arduino robotic kit sold by Robotshop. This kit contains:
- A compatible Arduino board including:
- Dual H-bridge and onboard voltage regulator
- An onboard charger
- A Bluetooth module
- An aluminum frame
- Tamiya Twin-Motor Gear Box
- Tamiya Track and Wheel Set
- Lithium Polymer Battery Cell – 3.7V 1000mAh

The kit is complete and well documented but if you want to go hard core and start with a classic Arduino board, you can obtain the same result with following components:
- An Arduino compatible board
- An Arduino motor shield
- A pair of two 5v motors and 4 Wheels & frame
- A Bluetooth module
- 4xAA battery & holder
The goal of this article is to set the basic building blocks to build a robotic platform that you can extend to finally build an autonomous robot. Therefore, to enable the robot to sense his environment we extend the base platform with:
3 x ultrasonic sensors HC-SR04

1x Accelerometer MMA7361.

1x Compass HMC5883L

You can find all these components, including the wheels & frames in shops selling Arduino compatible boards online like SainSmart or Robotshop.
Design
For the design I choosed to remotely control the robot from a server (a laptop or pc). This design overcomes the limited processing & storage of the Arduino board but it comes at the expense of autonomy. My robot will not be able to evolve without be connected by Bluetooth to his server. This is a concession I’ve to make but it provides me quasi infinitely processing power and makes my robot accessible through the internet.
The Arduino board plays the role of central nervous system and the PC is the brain. Another advantage that offers this design is that the robot can be controlled from anywhere in the world as it is exposed through http by a node.js application.
On the Arduino board runs a small program named “Firmata”. This program enables you to control the Arduino board remotely through the Firmata protocol. You’ll send commands from the server to the robot through a serial connection. On the server side you’ll program your robot with Javascript using the johnny-five node library. This library provides an abstraction over the Firmata protocol and enable us to interact with the Arduino board and a lot of the Arduinos compatible electronic devices like sensors and motors.
The robot can be remotely controlled and followed through a web interface dashboard. The dashboard is a single page application built with angular.js . The html, images, css and javascript resources are served by express.js. Express.js is the default web application framework for node. Express.js is also used to expose a rest based API. Through this REST interface, the radar and accelerometer data can be retrieved and commands can be send to the motor. This allow you to program and control the robot via any device using the programming language of your choice.
To enable real time communication in both directions between the server and the robot I’ve used socket.io.

Assemble and configure your robot.
To assemble the DFRobotshop RoverV2 you can follow this video. As I’m a Lego fan and that with two little boys in house I’ve a lot of little bricks, I’d no difficulties to find all pieces I needed to build a Lego frame where I could mount the ultrasonic sensors, the accelerometer and the compass on it. Here you can find a picture of the end result.
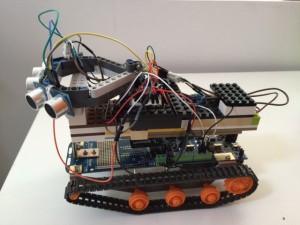
It’s up to you to decide to copy the design or make your own as long as you use the same core components and follow the schematics provided here beneath the code will be compatible with your robot.
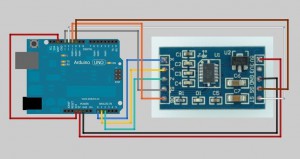
Scematics
Here you can find the schematics for your robot:

Accelerometer
As the accelerometer MMA7361 can vary slightly between manufacturers and models I provide an alternative schematic only for the accelerometer:
Configure your Robot
Prerequisites:
Before you start make sure you’ve setup the following tools on your box:
– Git : https://git-scm.com/
– Node 0.10.40 for x86 : https://nodejs.org/dist/v0.10.40/
– Python 2.7.x : https://www.python.org/downloads/release/python-2710/
If you’re on windows make sure you’ve configure your PATH correctly for all of these tools, therefore I suggest you use Chocolatey to install all of these components.
Download the code
Create your working folder:
c:\Dev>mkdir arduino
cd arduino
Clone the repository:
c:\Dev\arduino> git clone https://github.com/geobarteam/johnny5.git
Install the packages:
c:\Dev\arduino\johnny5> npm install
You could receive some warnings here, don’t panic it should still be working fine.
Flashing your Arduino board
Because the onboard bluetooth ship is limited to 9600 baud I’hd to patch the firmate protocol. This patched version can be found on the root folder.
- Open the Arduino IDE
- Connect your Robot to your PC through the usb cable and temporarly remove the bluetooth module from your Arduino board
- In the IDE select the correct com port
- Choose, File, open and select the “firmate_pulse_9600B_patch.ino” file located under: ..\johnny5\firmate_pulse_9600B_patch
- Push the upload button
- Reconnect your bluetooth module
Connect to your Arduino board through Bluetooth
You should go to your Bluetooth settings and associate your Bluetooth with a COM port. On resent versions of windows you should click on the Bluetooth icon, choose “Add Bluetooth devices”. You should see “Bluetooth_Bee_V3” click on it and enter the secret code: 1234.
You need to know which COM port windows as configured to your outgoing connections to you robot. Therefore open the Bluetooth settings, select the COM ports tab and note which COM port is associated with your Bluetooth_Bee_V3 outgoing connection.

Configure and start the server
With your preferred IDE modify the variable “comport” in the “app.js” file with the COM port you connected the Arduino with.
On the Johnny5 folder, start the program => “node app.js”


Start your preferred browser on http://localhost:3000 , you should now be able to control your robot through the interface:

Enjoy!